Pages

Monday, November 30, 2009

A New Thanksgiving Tradition

This is a pumpkin pound cake that has become a tradition with my husband's side of the family. The kids love it even without whipped cream!
Pumpkin Pound Cake

2 1/2 cups sugar
1 cup vegetable oil
3 eggs
2 teaspoons vanilla
3 cups all purpose flour
2 teaspoons baking soda
1 teaspoon cinnamon
1 teaspoon ground nutmeg
1/2 teaspoon salt
1 can (15 ounces) solid-pack pumpkin
1 cup chopped pecans

In a mixing bowl, blend sugar and oil. Add eggs, one at a time, beating well after each addition. Add vanilla and pumpkin, mix well. Combine flour, baking soda, cinnamon, nutmeg, and salt; add to pumpkin mixture. Stir in pecans. Pour into a greased 12-cup flted tube pan.

Bake at 350 degrees for 60-65 minutes or until a toothpick inserted near the center comes out clean. Cool for 10 minutes before inverting onto a wire rack. Remove pan; cool completely. Dust with confectioners' sugar.


I found this recipe in a Taste of Home's Holiday Recipe collection and I tweaked a little bit to fit our tastes. Please check out other Thanksgiving traditions at Bake at 350's blog. She always has great ideas!

Wednesday, November 4, 2009

Fall Party Cupcakes

Aaron needed cupcakes for his class's fall party. So I thought I would decorate them with some homemade monsters. He is always drawing monsters, sharks, and dinosaurs so I thought he would enjoy them. Although I made mine happy and his are usually scary.
When I picked him up after school his first words were, I thought you were making pumpkins! So much for my creativity.

My limited how-to is in the post below!
Posted by Picasa

How to: Melted Candy Monsters

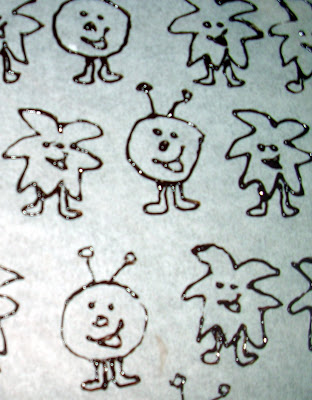
When I make candy creatures for cupcakes and cakes, I begin with a drawing. For these particular monsters, I couldn't find anything cute and fun, so I drew them myself. Sorry the picture is blurry, my camera has been acting up.
Next, I use a piece of wax paper and place my drawings behind it, so that I can see them clearly. Then I trace the drawings with melted semi-sweet chocolate. I found that a ziploc freezer bag works just great for this, just cut a small hole in one of the bottom corners. As you could see in the previous picture I only drew two monsters, so you need to carefully slide it under the wax paper to clean spot, to begin again. When I was finished, I slid my wax paper onto a cookie sheet or cutting board and put them in the freezer while I went on to the next step.

The next step is to melt candy wafers. Since I am only able to get to a place that carries these once in a blue moon, living in the middle of nowhere has an occasional drawback, the last time I purchased them I just got a big bag of white, thinking I would be able to mix what I needed later. I probably won't do that again until I find some better food coloring, the colors just weren't as bright as I had hoped.

It is best to follow the directions on the package of the candy wafers for melting, be careful not to over heat them. I also used freezer bags for this step. You need to fill a freezer bag with the melted wafers and carefully fill in your characters. Be sure to cover the entire area and then use a knife to smooth out your lines, being careful to not use too much pressure. You do not want your colored layer to be too thin, or they will break when you try to move them, but you do not want it too thick either. When I have finished filling the monsters in I place the chocolates back into the freezer or fridge to set up. I was in a hurry this day, so I placed them in the freezer. This is only the second time I have done this particular cake decoration, so I apologize if the directions are a little lacking. I must give credit to The Whimsical Bakehouse, I found the idea for these in their cookbook. They go into great detail, so the book is a great thing.

I love the look of these, it is have they came out of a child's coloring book! Have fun and be creative.
Posted by Picasa

Monday, September 28, 2009

Just for fun!!


I picked up "Hello, Cupcake!" in memory of my grandma. She loved to bake and she passed away last week. Aaron and I made the owl cupcakes today. I used a devil's food cake mix and canned frosting. We used oreos, junior mints and flavored tootsie rolls. Gracie also made an owl before she went to dance class.

I plan to post more baking this week and I have a post on a spicy chicken dish that I have been making since I was a junior in high school! Thanks for being patient with me!
Posted by Picasa

Thursday, September 3, 2009

Interesting . . .

I just realized that most of this blog has been cooking related and not baked perfection. That will be what I post next. Be looking for cupcakes and zucchini bread in the coming days. What kind of baking blog shares more recipes for meals than for desserts??? I will have to change that!

Wednesday, August 26, 2009

Haystacks


Thank you for being patient with me. My new kitchen is almost done, I will post pictures of that soon. But today I am going to share with you a recipe that has many memories for me. We call it 'Haystacks.' Once a year my grandma would make this meal, usually in the fall, and whatever family that was around would be there for this meal. My family insists on this meal at least several times a year. Of course, they call it 'Hay Bales!' I promise you that you will enjoy it, it is one that we make often for company. We layer it on our plates in no particular order, but the order I am sharing is the one I was raised with. I will begin the recipe with the order and then follow with the recipes for the meat sauce and cheese sauce. The great thing about this recipe is you can adapt it to your taste and you do not have to include everything on your 'stack.' Enjoy!!

HAYSTACKS
  1. crushed saltine crackers
  2. rice
  3. meat sauce
  4. chopped/shredded lettuce
  5. tomatoes
  6. chopped onion
  7. sliced olives
  8. chopped pecans
  9. cheese sauce
  10. Fritos corn chips
Meat Sauce

1.5 lbs hamburger
spaghetti sauce (I use Prego)
1/2 tsp Worcestershire
1/2 green pepper, chopped
2 ribs of celery, chopped

Cook hamburger, add gr. pepper and celery. Add spaghetti sauce and Worcestershire. Simmer for half an hour. Salt and pepper to taste.

Cheese Sauce

1 stick of butter
1/2 cup of flour
3 - 4 cups milk
16oz cheddar cheese, shredded
mustard
salt and pepper

melt butter in a medium saucepan, over medium heat. add flour and whisk constantly. Once flour and butter are combined add 3 cups of milk. Stir often until milk starts to thicken. Add shredded cheese a cup or so at a time. Stir until cheese is melted, if too thick add more milk. Add mustard to taste, start with 2 tsp. Add salt and pepper.

Thursday, July 16, 2009

So Sorry

I just wanted to write a quick note and apologize for not updating this blog for quite some time. I do have some wonderful recipes to share, but life has been a little crazy. At the present, we are in the middle of moving. I promise to be back really soon with some great recipes. I hope you are doing well. I also want to thank my faithful followers who have been checking in regularly. I am so sorry I haven't had anything new in quite some time. I must say I will be cooking up a storm after we move, I am loving my new kitchen!

Monday, May 4, 2009

Maui Chicken


This is another one of those restaurant recipes. There was a bar and grill that we went to occasionally when we lived in the KC area and when we went I always ordered the same thing - Maui Chicken. This is my version. I will also include how I make asparagus. My children love asparagus! I always serve the chicken with Uncle Ben's wild rice. Dave usually does the grilling, because does such a superb job with it. I am one lucky lady!!!

Maui Chicken

4-6 boneless, skinless chicken breasts
Lawry's Mesquite Marinade
4-6 slices of cheddar cheese
15 1/4 oz can of pineapple slices
BBQ sauce

Marinate chicken in the mesquite marinade for at least 30 min. You may marinate longer if you would like. Grill over medium heat until cooked through. Add cheddar slices the last couple of minutes of grilling. Grill pineapple slices, a couple minutes on each side. Place on top of cheddar. Serve with a side of BBQ sauce.

Enjoy!

Grilled Asparagus

Rinse and trim asparagus. Put asparagus in a pot and just cover with cold water. Bring to a boil and blanch for about 2 minutes or until bright green. Rinse several times with cold water. Drizzle with olive oil. Salt and pepper. I prefer kosher salt for this. Make sure all are coated with oil. Grill over medium heat for 3-4 minutes. Enjoy!!
Posted by Picasa

Sunday, April 5, 2009

Grandma's Caramel Rolls

This is one of those recipes that has been handed down from my grandmother. She had her recipe. Dad made his own changes to it, and then gave me his version. I, in turn, made a few minor changes and made them my own.
This is another one of those most requested recipes, although no one actually asks for the recipe. They request that I make them. And I don't mind acquiescing to this particular request.
In our family, we do one batch with pecans and one without. We are more caramel fans around here but they are very good with cream cheese frosting.
This is my dad's version.

Caramel Rolls

Dough:
2 1/2 cups warm milk
1/2 cup shortening
1/2 cup sugar
1 1/2 tsp salt
2 Tbsp yeast
2 eggs, beaten
7 3/4 cups all purpose flour

Mix thoroughly, let rise twice before shaping rolls. Separate into 2 halves, roll into a rectangular shape of your desired thickness. Spread softened butter onto dough, sprinkle with brown sugar and cinnamon. Roll and cut into 1 in - 1 1/2 in. thickness.

Caramel:
1 cup vanilla ice cream
1/4 cup heavy cream
1/2 cup white sugar
1 cup brown sugar
1 cup butter
1 tsp pure Almond Extract

Cook until melted, and then pour in pan before putting in rolls. Bake about 23 minutes on 350 degree oven.

I feel it is very important not to over bake these rolls. I hope you enjoy.


Monday, March 30, 2009

Happy Birthday, Gracie!


Saturday was Gracie's birthday, it was also my Spring/Summer Tastefully Simple Open House. We had one of those weeks you hope never happen, so I was running around like crazy on Saturday. Gracie was very specific on her request for a cake and I was so rushed that it didn't turn out the way I had planned. It is never good to rush, especially when you are baking and decorating. I may make another one just to make up for the lack of creativity on this one. But, I did do exactly what she asked me to do: a chocolate cake with chocolate frosting and green grass and of course her ponies that she cleaned so they could be used.

At the last minute some friends joined us at Grandma and Grandpa's house for supper and cake. To read about my week please visit here.

Saturday, March 21, 2009

Chicken Lasagna

Ok, before I begin I need to apologize for being so late with this post. Too much has been going on for me to sit down and recall how I made this. Please forgive me. Also, I can never remember to take pictures, but I hope to do some baking today and I will try to remember to take pictures of that. I am also working on an instruction post to show you how I made the bugs on my first post for this blog.

Alright, I am ready to begin my recipe. I will keep it simple. Remember the last two times I have made this I was catering, so I didn't make my homemade alfredo sauce. I am going to share the recipe for this lasagna using store-bought alfredo, if you would like my recipe let me know and I will post it.

Chicken Lasagna

3 cups shredded chicken ( I usually just boil and shred one whole chicken)
1 10oz frozen box of chopped spinach, thawed and wrung out in a clean towl
10-12 cloves of garlic, minced
1/2 of a purple onion, finely chopped
1-2 Tbsp olive oil
3-4 cups mozzerella cheese, shredded
1 jar of alfredo sauce, if you love garlic, the garlic alfredo is very good
6 lazagna noodles

Preheat oven at 350 degrees. In a large pot or skillet, heat olive oil over medium heat. Add garlic and onion. Saute until onion is transparent, add spinach. Once spinach is heated through add chicken and alfredo sauce. Heat until warm.

Spray 9x13 pan with cooking spray. Spread 1/3 of alfredo mixture on bottom of pan. Next layer 1 cup of cheese. Then layer 3 lasagna noodles. Follow with 1/3 alfredo mixture, then cheese, then 3 lasagna noodles. Finish with the final 1/3 of alfredo and top with cheese, you may add more cheese to this last layer if you choose. Cover with aluminum foil and place in oven for roughly one hour. You may take the aluminum off for the last 5-10 minutes to brown the top of the lasagna.

I hope you enjoy. As I have said, most of these recipes are mine and I rarely measure, unless I am baking. That is what I love about cooking, I can create something different all of the time. I also like to make this alfredo sauce and use bowtie pasta and toasted pine nuts! Yum!!

Tuesday, March 17, 2009

My Catering Event

Last night, I catered the After 5 event held at Common Ground. This is the second time I have done this. I had a good time once again, thanks to good help and the added bonus of their request for the same thing I made the first time I catered for them. My chicken lasagna. Of all my recipes, this is the one that is requested the most. I can't even remember why I created it, but it has been a favorite for many years. It is full of all kinds of yumminess, but that is all I am going to say for now. I hope to post the recipe tomorrow.

I fed 51 people last night and the menu was:

lettuce salad with my version of Olive Garden's salad dressing
chicken lasagna
garlic bread
fresh strawberry cupcakes with cool whip/strawberries

There were more requests for the recipe and they asked me to include it in their cookbook. They are celebrating their 25th anniversary. I am so glad they asked me to do this, I always have so much fun!

Considering my personality, I always surprise myself by pulling off these events without stressing myself out and being behind schedule. Those of you that know me, know what I am talking about. But, I have been able to be ahead of schedule each time (3 total)!

Tuesday, March 3, 2009

Diamondback Chicken Pasta

Today's recipe came about because we don't ever get to go to restaurants any more. There was a wonderful Mexican place in the KC area that we frequented and I would often get their Rattlesnake Pasta. This is my take on it. I have to say this is the closest I have ever come to replicating a dish on taste alone. This also includes a Tastefully Simple Fall/Winter product, as well as something from the standard line.

I should also tell you that the first time I made this I did not have enough for everyone to have the thirds they were requesting so this is the recipe doubled. It probably would feed eight adults easily, but my hubby says it is even better the second day!

Diamondback Chicken Pasta

4 large boneless, skinless chicken breasts
1/3 to 2/3 tequila
1Tbsp lime juice
salt and pepper
olive oil
1 red bell pepper
1 green bell pepper
1 yellow bell pepper
1 red onion
8 oz cream cheese
1 packet Viva Garlic! Alfredo Sauce Mix (Tastefully Simple)
1 pint heavy cream
1 stick of butter
approx. 1/2 c milk
1/3 c Parmesan cheese
2 Tbsp Fiesta Party Mix (Tastefully Simple)
2 bags of bow tie pasta, cooked

Marinate the chicken breasts with the tequila,lime and season with salt and pepper. I always like to marinate in a ziploc. Marinate for at least 1/2 an hour.

Grill chicken breasts, 10-15 min each side. Slice peppers and onion in half, brush with olive oil, and place on grill. Grill 3-5 min each side.

In a saucepan, combine heavy cream, cream cheese and butter over medium low heat, stirring often. When cream cheese and butter are melted, add the Alfredo sauce mix, Fiesta Party Mix and Parmesan cheese. Continue to stir. Add milk to reach a good consistency. I don't like it too thick, but like for it to coat the noodles well.

Combine noodles and sauce. Slice grilled chicken breasts and thinly sliced peppers and onions. Add to noodles or place on top of each serving.


I am new to creating recipes, and honestly, I do a lot of the 'dump' method. So please let me know what I need to explain or correct. I hope you enjoy this as much as my family does!!

Monday, March 2, 2009

Gourmet Grilled Cheese Sandwiches

I want to start my recipes with this very easy, very yummy sandwich. This particular recipe calls for something in the Tastefully Simple Fall/Winter line, which will be retiring this Sunday, March 8. The product is Italian Garlic Bread Seasoning. If you think this recipe sounds like a keeper to you, please contact your Tastefully Simple consultant before Sunday. If you don't have a consultant please visit my website at: tastefullysimple.com/web/kcampbell2.

Gourmet Grilled Cheese Sandwiches

1 Tbsp Italian Garlic Bread Seasoning
1 stick butter
loaf of sourdough bread, 2 slices per sandwich
deli ham slices, 2-3 slices per sandwich
provolone chees, 1 slice per sandwich
sliced tomato, 1-2 slices per sandwich
Dijon mustard.

Mix IGB Seasoning and butter together and let set for 20-30 min. Let griddle warm. If using an electric griddle, set at 325 degrees. Spread Dijon mustard on a slice of sourdough bread, layer ham, cheese and tomato on top. Cover with second slice of sourdough, butter the outer sides of sandwich with Italian Garlic butter. Place on hot griddle, cook for 2-3 minutes or golden brown and flip. Repeat for other sandwiches. Also, my husband likes to use pepper jack cheese instead of provolone. This makes 6-7 sandwiches.

Enjoy! I will soon include pictures, but I don't have any for these first few recipes.

Tomorrow . . . Diamondback Chicken Pasta

Saturday, February 28, 2009

Welcome!


I thought I would try my hand at blogging about something I love to do. I love to bake. I will bake pretty much anything, but I especially love to make cupcakes. Something I have always wanted to learn and hope to share is the art of bread making. Not just your average bread but sourdough and french baguettes and maybe even croissants and bagels.

I also enjoy creating recipes for my family's meals. I hope to share these as well. I have some recipes that have been handed down from my grandmother, some that have been passed on to me from friends and family and a pile of cookbooks and food magazines beckoning me to try something new. I hope that having this blog will keep me accountable to trying new things and sharing with you what does and does not work. I also love to create my own version of meals that we have had at restaurants, I miss those wonderful places and now try to create my own version of our favorites.

I really do hope you will enjoy this blog and please share your thoughts with me at anytime.

These are a few pictures of things I have done in the past.